WPF Fundamental
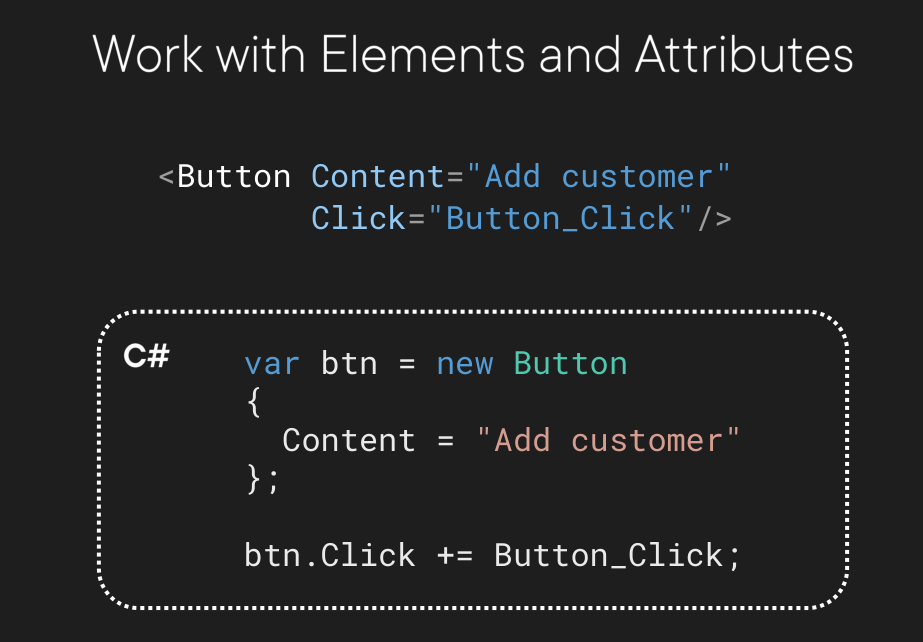
Xaml 에서 Object 생성
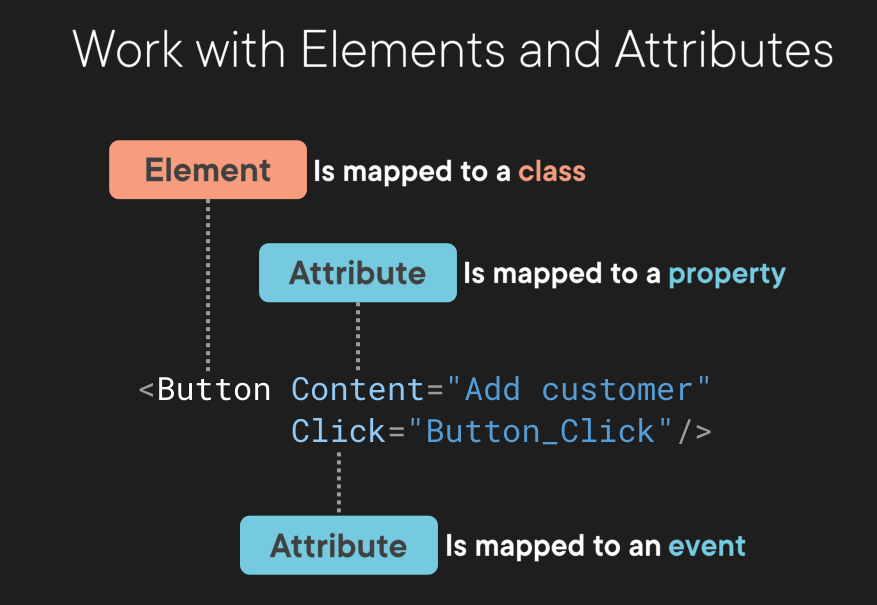
Elements and Attributes
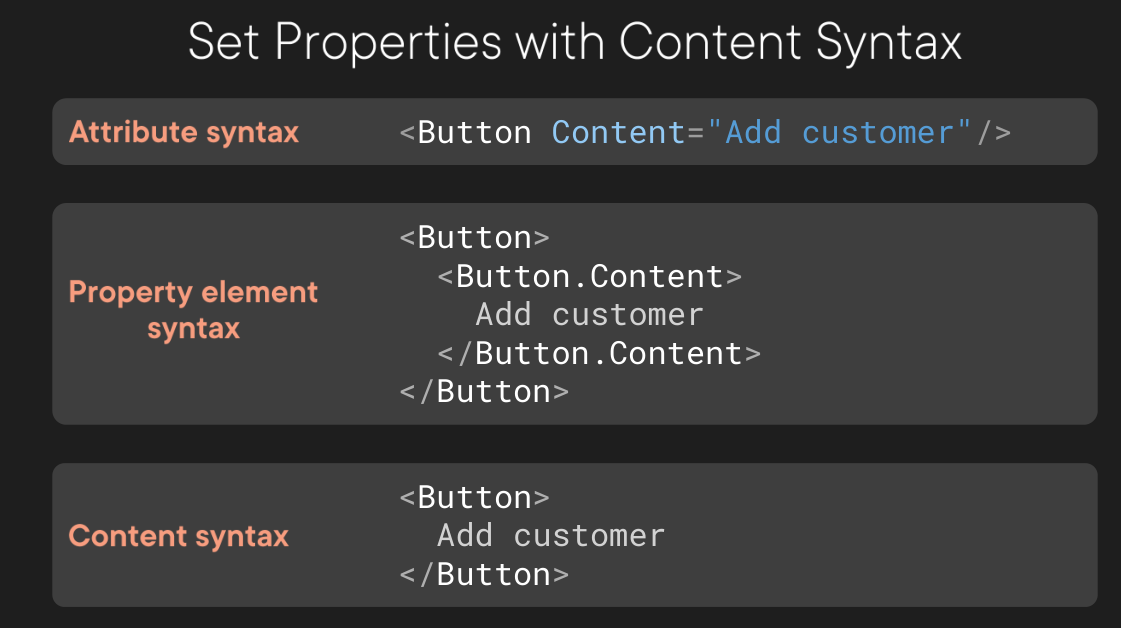
Set Property 와 Content Syntax
- Property를 값을 설정 하는 방법은 여러가지가 있는데 아래와 같음.
- Attribute로 설정
- Property Element 로 설정
- Content로 설정(xaml parser에 의한 자동설정)
3번째 Content로 설정은 어떻게 자동으로 일어 날까?
아래의 설명을 보자.
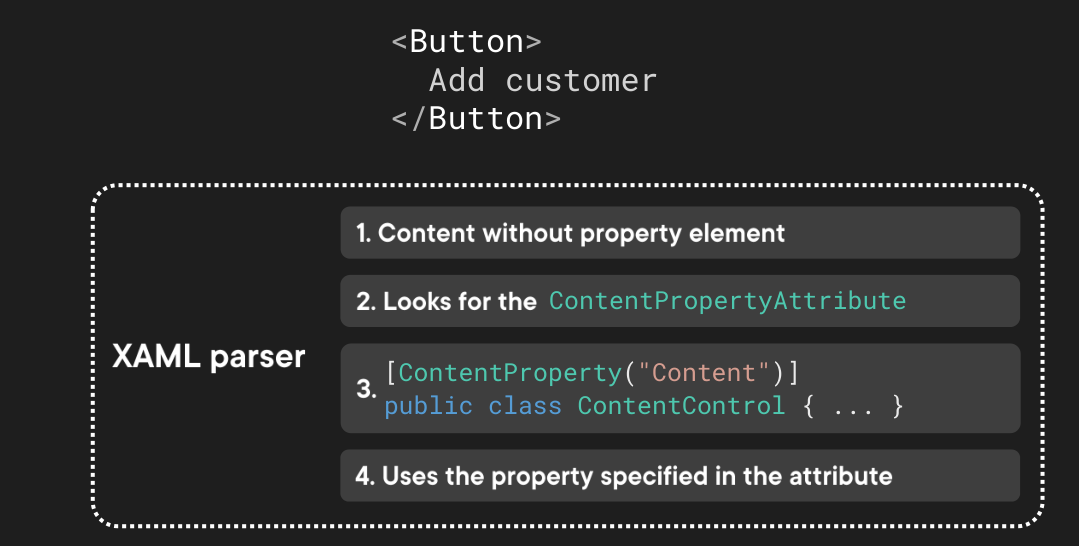
- 요약해 보자면, Property Element가 없이 Xaml에 설정됨
- Xaml Parser가 Control에 설정되어 있는 ContentPropertyAttribute를 찾음
- 해당 Property에 Mapping
Collection Syntax
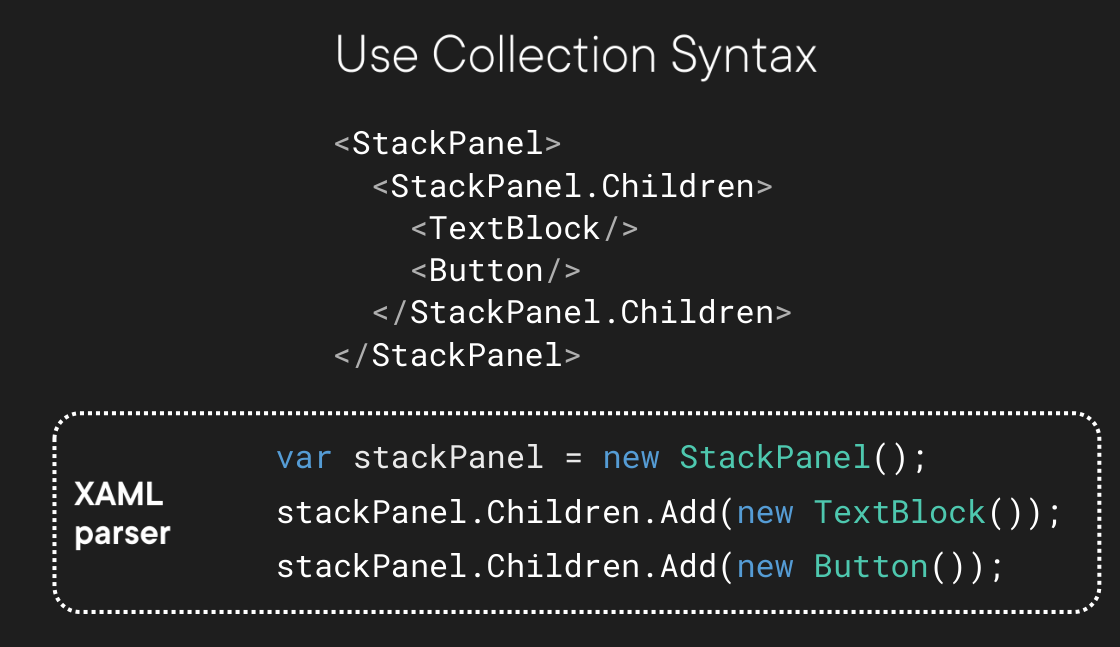
StackPanel의 ContentPropertyAttribute는 아래와 같고, 그래서 Content Syntax로 바꿔보면
바로 아래와 같이 간단해 지는 것이다.
[ContentProperty(Name = "Children")]
public abstract class Panel : FrameworkElement
{
  public UIElementCollection Children { get ... }
  ...
}
<!--Property Element 사용-->
<StackPanel>
  <StackPanel.Children>
    <TextBlock/>
    <Button/>
  </StackPanel.Children>
</StackPanel>

<!--Property Element 사용하지 않음(간결)-->
<StackPanel>
    <TextBlock/>
    <Button/>
</StackPanel>
위의 두가지 경우 모두 같은 결과를 보여줌
User Control
- [Simple Example] User Control
HeaderControl.xaml
<UserControl x:Class="WiredBrainCoffee.CustomersApp.Controls.HeaderControl"
             xmlns="http://schemas.microsoft.com/winfx/2006/xaml/presentation"
             xmlns:x="http://schemas.microsoft.com/winfx/2006/xaml"
             xmlns:mc="http://schemas.openxmlformats.org/markup-compatibility/2006"
             xmlns:d="http://schemas.microsoft.com/expression/blend/2008"
             xmlns:local="clr-namespace:WiredBrainCoffee.CustomersApp.Controls"
             mc:Ignorable="d"
             d:DesignHeight="450" d:DesignWidth="800">
  <Grid Background="#F05A28">
    <StackPanel HorizontalAlignment="Center" Orientation="Horizontal">
      <Image Source="/Images/logo.png" Width="100" Margin="5"/>
      <TextBlock Text="Customers App" FontSize="30"
                 Foreground="White" VerticalAlignment="Center"/>
    </StackPanel>
  </Grid>
</UserControl>
CustomersView.xaml
<UserControl x:Class="WiredBrainCoffee.CustomersApp.View.CustomersView"
             xmlns="http://schemas.microsoft.com/winfx/2006/xaml/presentation"
             xmlns:x="http://schemas.microsoft.com/winfx/2006/xaml"
             xmlns:mc="http://schemas.openxmlformats.org/markup-compatibility/2006"
             xmlns:d="http://schemas.microsoft.com/expression/blend/2008"
             xmlns:local="clr-namespace:WiredBrainCoffee.CustomersApp.View"
             mc:Ignorable="d"
             d:DesignHeight="450" d:DesignWidth="800">
  <Grid>
    <Grid.ColumnDefinitions>
      <ColumnDefinition Width="Auto"/>
      <ColumnDefinition/>
    </Grid.ColumnDefinitions>

    <!-- Customer list -->
    <Grid x:Name="customerListGrid"
          Background="#777">
      <Grid.RowDefinitions>
        <RowDefinition Height="Auto"/>
        <RowDefinition/>
      </Grid.RowDefinitions>
      <StackPanel Orientation="Horizontal">
        <Button Margin="0 10 10 10" Click="ButtonMoveNavigation_Click">
          <Image Source="/Images/move.png" Height="18"/>
        </Button>
      </StackPanel>
    </Grid>

    <!-- Customer detail -->
    <StackPanel Grid.Column="1" Margin="10">
      <Label>Firstname:</Label>
      <TextBox/>
    </StackPanel>
  </Grid>
</UserControl>
MainWindow.xaml
<Window x:Class="WiredBrainCoffee.CustomersApp.MainWindow"
        xmlns="http://schemas.microsoft.com/winfx/2006/xaml/presentation"
        xmlns:x="http://schemas.microsoft.com/winfx/2006/xaml"
        xmlns:d="http://schemas.microsoft.com/expression/blend/2008"
        xmlns:mc="http://schemas.openxmlformats.org/markup-compatibility/2006"
        xmlns:controls="clr-namespace:WiredBrainCoffee.CustomersApp.Controls"
        xmlns:view="clr-namespace:WiredBrainCoffee.CustomersApp.View"
        mc:Ignorable="d"
        Title="Customers App"
        d:DesignWidth="700" d:DesignHeight="600" Height="500" Width="800" FontSize="20">
  <Grid>
    <Grid.RowDefinitions>
      <RowDefinition Height="Auto"/>
      <RowDefinition Height="Auto"/>
    </Grid.RowDefinitions>

    <controls:HeaderControl Grid.Row="1"/>
    <view:CustomersView Grid.Row="2"/>
  </Grid>
</Window>
Data Binding
Binding Another Element(다른 요소와 바인딩)
- 화면을 디자인 하다 보면 Control끼리 바인딩을 하게 되는데
- 간단하게 ListView와 TextBox 간 Binding 예제를 보자
[Simple Example] Binding Another Element
<ListView x:Name="customerListView" Grid.Row="1" Margin="10 0 10 10">
  <ListViewItem>Julia</ListViewItem>
  <ListViewItem>Alex</ListViewItem>
  <ListViewItem>Thomas</ListViewItem>
</ListView>

<TextBox
  Text="{Binding ElementName=customerListView, Path=SelectedItem.Content,
    Mode=TwoWay, UpdateSourceTrigger=PropertyChanged}"/>
- Binding 내부에 속성을 설정할 때 “ “ 를 사용하지 않는다.
- 속성간 구분은 쉼표 , 로 한다.
Binding Source? 를 설정 하는 방법은 아래 그림과 같은데

- ElementName : 바로 위의 코드 처럼 Source Element에서 x:Name을 설정한 후 Target Element에서
Binding ElementName으로 설정 하는 방법이다. - Source 는 StaticResource를 설정해 놓고 사용하는 방법이다.
- RelativeSource는 상대적인 Element위치를 가지고 설정
- 가장 중요한 DataContext를 활용한 방법이다.
DataContext 의 동작
// Level_2가 Text에 출력된다.
  <Grid DataContext="level_1">
    <StackPanel DataContext="level_2">
      <TextBlock Text="{Binding}"></TextBlock>
    </StackPanel>
  </Grid>

// 바로 위 부모의 DataContext가 없다면 부모를 계속 해서 찾아 올라간다.
//DataContext를 찾을 때 까지
//Level_1 이 Text에 출력된다.
  <Grid DataContext="level_1">
    <StackPanel>
      <TextBlock Text="{Binding}"></TextBlock>
    </StackPanel>
  </Grid>
- 기본적으로 모든 Element는 DataContext를 설정 할 수 있다.
- 위 코드를 보면 TextBock의 Text가 Binding을 사용하고 있다.
- TextBlock은 바로위 부모의 DataContext를 찾고, 없으면 부모의 부모 또 없으면 계속 해서 부모로 올라간다.
DataContext에 ViewModel 를 통한 Binding
[Simple Example] ViewModel Binding
첫번째로 Model Data를 정의 한다.
public class Customer
{
  public int Id { get; set; }
  public string? FirstName { get; set; }
  public string? LastName { get; set; }
  public bool IsDeveloper { get; set; }
}
ViewModelBase를 정의한다.
PropertyChange에 대한 구현은 공통으로 사용, INotifyChange를 상속받은 ViewModelBase를 만든다.
public class ViewModelBase : INotifyPropertyChanged
{
  public event PropertyChangedEventHandler? PropertyChanged;

  protected virtual void RaisePropertyChanged([CallerMemberName] string? propertyName = null)
  {
    PropertyChanged?.Invoke(this, new PropertyChangedEventArgs(propertyName));
  }
}
Customer를 Wrapping할 CustomerItemViewModel 만든다.
  public class CustomerItemViewModel : ViewModelBase
  {
    private readonly Customer _model;

    public CustomerItemViewModel(Customer model)
    {
      _model = model;
    }

    public int Id => _model.Id;

    public string? FirstName
    {
      get => _model.FirstName;
      set
      {
        _model.FirstName = value;
        RaisePropertyChanged();
      }
    }

    public string? LastName
    {
      get => _model.LastName;
      set
      {
        _model.LastName = value;
        RaisePropertyChanged();
      }
    }

    public bool IsDeveloper
    {
      get => _model.IsDeveloper;
      set
      {
        _model.IsDeveloper = value;
        RaisePropertyChanged();
      }
    }
  }
View의 DataContext에 연결할 CustomersViewModel을 만든다.
//Customer ViewModel
  public class CustomersViewModel : ViewModelBase
  {
    public CustomersViewModel()
    {
       // Customers 데이터를 업데이트 하는 코드가 필요~~
    }

    public ObservableCollection<CustomerItemViewModel> Customers { get; } = new();
  }
여기까지 왔다면 ViewModel은 완성이 되었고, View에 Binding 해보자.
CustomersView.xaml.cs
  public partial class CustomersView : UserControl
  {
    private CustomersViewModel _viewModel;

    public CustomersView()
    {
      InitializeComponent();
      _viewModel = new CustomersViewModel();
      DataContext = _viewModel;
    }
  }
View.xaml
      <ListView x:Name="customerListView"
                ItemsSource="{Binding Customers}"
                DisplayMemberPath="FirstName"
                Grid.Row="1" Margin="10 0 10 10"/>

      <TextBox Text="{Binding ElementName=customerListView,
                      Path=SelectedItem.FirstName,
                      Mode=TwoWay, UpdateSourceTrigger=PropertyChanged}"/>
IValueConverter 를 이용한 Data Convert
- ViewModel을 Binding 할 때 논리적인 값을 View에 속성 값으로 변경해 주어야 하는 경우가 발생 한다.
- 이 떄 IValueConverter를 이용 하면 ViewModel의 속성을 View에 속성 타입으로 변경해 줄 수 있다.
[Simple Example] IValueConverter
View Model 정의
public class ViewModelConv : ViewModelBase
{
    private int _checked = 0;
    public int Checked
    {
        get => _checked;
        set
        {
            _checked = value;
            RaisePropertyChanged(nameof(Checked));
        }
    }
}

public class ViewModelBase : INotifyPropertyChanged
{
    public event PropertyChangedEventHandler PropertyChanged;

    protected virtual void RaisePropertyChanged(string propertyName)
    {
        PropertyChanged?.Invoke(this, new PropertyChangedEventArgs(propertyName));
    }
}
ValueConverter 정의
    public class ValueConverter : IValueConverter
    {
        public object Convert(object value, Type targetType, object parameter, CultureInfo culture)
        {
            var inputValue = value == null ? 0 : (int)value;
            return inputValue %2 == 0;
        }

        public object ConvertBack(object value, Type targetType, object parameter, CultureInfo culture)
        {
            //TODO Only TwoWay
            throw new NotImplementedException();
        }
    }
View에서 Converter 설정
<Window x:Class="WpfConverter.MainWindow"
        xmlns="http://schemas.microsoft.com/winfx/2006/xaml/presentation"
        xmlns:x="http://schemas.microsoft.com/winfx/2006/xaml"
        xmlns:d="http://schemas.microsoft.com/expression/blend/2008"
        xmlns:mc="http://schemas.openxmlformats.org/markup-compatibility/2006"
        xmlns:local="clr-namespace:WpfConverter"
        mc:Ignorable="d"
        Title="MainWindow" Height="450" Width="800">
    <Window.Resources>
        <local:ValueConverter x:Key="ValueConv" />
    </Window.Resources>
    <Grid>
        <Grid.RowDefinitions>
            <RowDefinition Height="30"></RowDefinition>
            <RowDefinition Height="*"></RowDefinition>
        </Grid.RowDefinitions>

        <StackPanel Orientation="Horizontal" HorizontalAlignment="Left">
            <CheckBox IsChecked="{Binding Checked, Converter={StaticResource ValueConv}}"></CheckBox>
            <Button Width="100" Click="ButtonBase_OnClick"></Button>
        </StackPanel>
    </Grid>
</Window>
- 위 코드는 button Click 이벤트가 없지만 실제 Button_Click 이벤트 에서는
값을 +1 해주고 있다. - ValueConter에서 짝수인 경우에 True, 홀수인 경우에 False를 반환해 주고
- CheckBox에 IsChecked에 맵핑 시켜준다.
- 예제를 위한 어거지 변환 이라고 생각하지만 그냥 보자 ㅎㅎ
Command 를 통한 코드(이벤트) 실행
Command의 이해
Command 의 구조

[Simple Example] Command의 활용
Before Code
- MainWindow.xaml
<Window x:Class="WpfCommand.MainWindow"
        xmlns="http://schemas.microsoft.com/winfx/2006/xaml/presentation"
        xmlns:x="http://schemas.microsoft.com/winfx/2006/xaml"
        xmlns:d="http://schemas.microsoft.com/expression/blend/2008"
        xmlns:mc="http://schemas.openxmlformats.org/markup-compatibility/2006"
        xmlns:local="clr-namespace:WpfCommand"
        mc:Ignorable="d"
        Title="MainWindow" Height="350" Width="525">
    <Grid>
        <Button Width="200" Height="100" Click="ButtonBase_OnClick">Click</Button>
    </Grid>
</Window>
- MainWindow.xaml.cs
public partial class MainWindow
{
    public MainWindow()
    {
        InitializeComponent();
    }

    private void ButtonBase_OnClick(object sender, RoutedEventArgs e)
    {
        MessageBox.Show("Hello World");
    }
}
- 위의 예제를 보면 Button Click 이벤트를 통해서 코드 비하인드 파일에 직접 코딩을 했다.
- View와 이벤트가 겹합도가 높다.
After Code(with Command)
//ViewModel
public class ButtonViewModel
{
    public DelegateCommand ShowMsgBoxCommand { get; }

    public ButtonViewModel()
    {
        ShowMsgBoxCommand = new DelegateCommand(OnButtomClick);
    }
    private void OnButtomClick(object obj)
    {
        MessageBox.Show("Hello World");
    }
}

//Delegate Command
public class DelegateCommand : ICommand
{
    private readonly Action<object> _execute;
    private readonly Func<object, bool> _canExecute;

    public event EventHandler CanExecuteChanged;
    public void Execute(object parameter) => _execute(parameter);
    public bool CanExecute(object parameter) => _canExecute is null || _canExecute(parameter);

    public void RaiseCanExecuteChanged() => CanExecuteChanged?.Invoke(this, EventArgs.Empty);
    public DelegateCommand(Action<object> execute, Func<object,bool> canExecute = null)
    {
        if (execute == null)
            throw new ArgumentException();

        _execute = execute;
        _canExecute = canExecute;
    }

}
<!-->MainWindow.xaml<-->
<Window x:Class="WpfCommand.MainWindow"
        xmlns="http://schemas.microsoft.com/winfx/2006/xaml/presentation"
        xmlns:x="http://schemas.microsoft.com/winfx/2006/xaml"
        xmlns:d="http://schemas.microsoft.com/expression/blend/2008"
        xmlns:mc="http://schemas.openxmlformats.org/markup-compatibility/2006"
        xmlns:local="clr-namespace:WpfCommand"
        mc:Ignorable="d"
        Title="MainWindow" Height="350" Width="525">
    <Grid>
        <Button x:Name="Btn" Width="200" Height="100"
                Command="{Binding ShowMsgBoxCommand}"
                CommandParameter="{Binding ElementName=Btn}"
                Content="Click"
                >
        </Button>

    </Grid>
</Window>
재사용 가능한 Resources
Xaml Resource
- 모든 Element에는 Resource 속성이 존재 한다.
- ResourceDictionary 라는 데이터 타입으로 정의 되어 있다.
- ResourceDictionay에 Object Key, Object Value를 추가 할 수 있다.
아래의 예제처럼 사용할 수 있다.
<Window x:Class="WPFResource.MainWindow"
        xmlns="http://schemas.microsoft.com/winfx/2006/xaml/presentation"
        xmlns:x="http://schemas.microsoft.com/winfx/2006/xaml"
        xmlns:d="http://schemas.microsoft.com/expression/blend/2008"
        xmlns:mc="http://schemas.openxmlformats.org/markup-compatibility/2006"
        xmlns:local="clr-namespace:WPFResource"
        mc:Ignorable="d"
        Title="MainWindow" Height="350" Width="525">
    <Grid>
        <Grid.Resources>
            <SolidColorBrush x:Key="BtnColor" Color="DeepPink" />
        </Grid.Resources>

        <Button Width="200" Height="200" Background="{StaticResource BtnColor}">Color Button</Button>
    </Grid>
</Window>
- Resource키를 찾을 때는 상위 부모를 계속 해서 찾아 올라 간다.
- 그렇다면 전체 프로그램 리소스도 정의 할 수 있지 않을까? 물론 할 수 있다.
- xaml에서 최상의 부모는 App.xaml 에 있는 Application Element 이다.
최상의 Xaml Element에 Resource정의
<Application x:Class="WPFResource.App"
             xmlns="http://schemas.microsoft.com/winfx/2006/xaml/presentation"
             xmlns:x="http://schemas.microsoft.com/winfx/2006/xaml"
             xmlns:local="clr-namespace:WPFResource"
             StartupUri="MainWindow.xaml">
    <Application.Resources>
         <SolidColorBrush x:Key="TopBrush" Color="OrangeRed"></SolidColorBrush>
    </Application.Resources>
</Application>
- 프로그램 전체에서 사용 할 수 있는 Resource를 정의 했다.
- 당연한 이야기 이지만, Resource의 Value는 Object이기 때문에 모든 객체를 사용 할 수 있다.
Resource Dictionary
- 특정 폴더에 Resource 관련 데이터를 몰아 놓고 싶은 생각이 든다.
- 그렇다면 Resource Dictionary를 활용 할 수 있다.
[Simple Example] Resource Dictionary
아래와 같이 Resource전용 폴더를 만든고
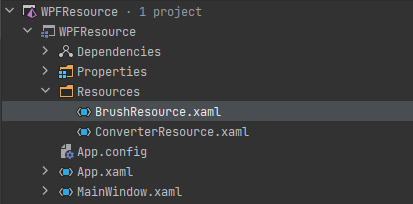
xaml 에서 아래와 같이 셋팅 하면 된다.
<!--> BrushResource.xaml <-->
<ResourceDictionary xmlns="http://schemas.microsoft.com/winfx/2006/xaml/presentation"
                    xmlns:x="http://schemas.microsoft.com/winfx/2006/xaml">
    <SolidColorBrush x:Key="SBrush" Color="IndianRed"></SolidColorBrush>
</ResourceDictionary>

<!--> ConverterResource.xaml <-->
<ResourceDictionary xmlns="http://schemas.microsoft.com/winfx/2006/xaml/presentation"
                    xmlns:x="http://schemas.microsoft.com/winfx/2006/xaml">
    <BooleanToVisibilityConverter x:Key="BooleanToVisibilityConv" />
</ResourceDictionary>


<!--> App.xaml <-->
<Application x:Class="WPFResource.App"
             xmlns="http://schemas.microsoft.com/winfx/2006/xaml/presentation"
             xmlns:x="http://schemas.microsoft.com/winfx/2006/xaml"
             xmlns:local="clr-namespace:WPFResource"
             StartupUri="MainWindow.xaml">
    <Application.Resources>
        <ResourceDictionary>
            <ResourceDictionary.MergedDictionaries>
                <ResourceDictionary Source="/Resources/BrushResource.xaml"></ResourceDictionary>
                <ResourceDictionary Source="/Resources/ConverterResource.xaml"></ResourceDictionary>
            </ResourceDictionary.MergedDictionaries>
        </ResourceDictionary>
    </Application.Resources>
</Application>
Data Templates 활용
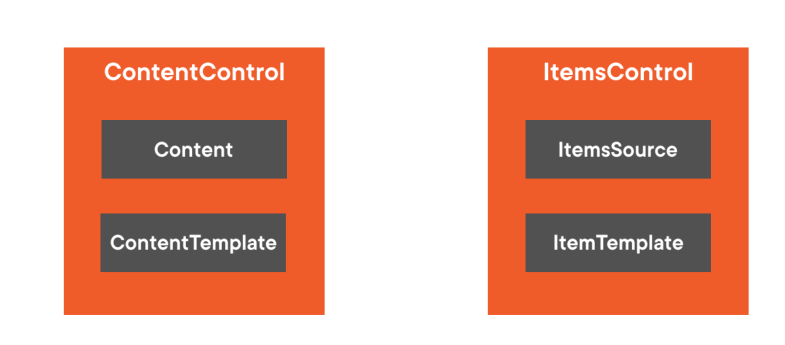
ContentControl의 Rendering 동작
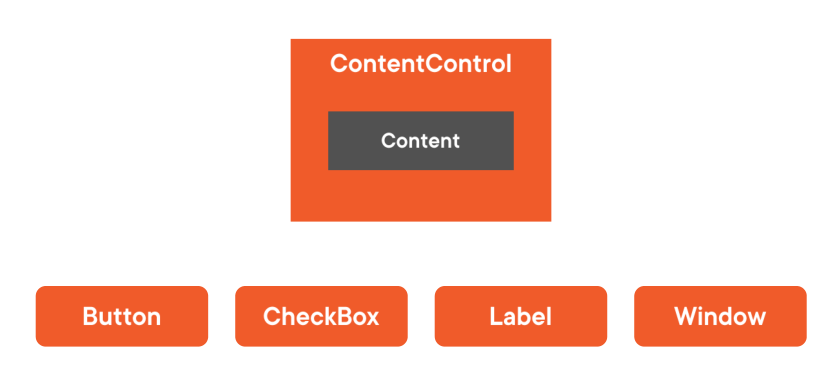
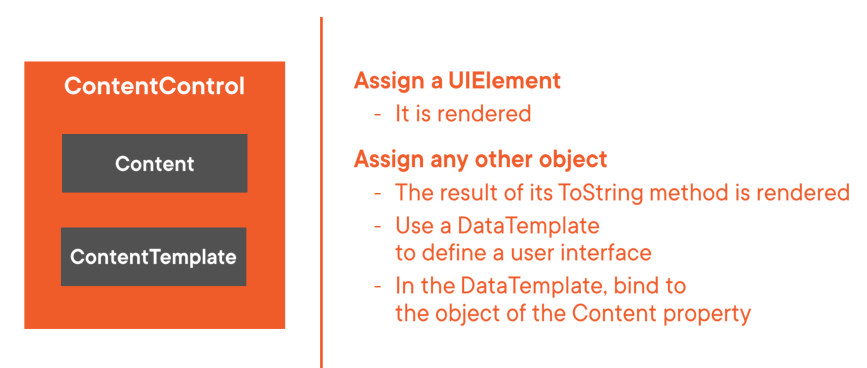
- Content Property에 대해서는 위에서 이미 설명을 했다.
- UIElement를 상속받은 객체들은 Rendering이 잘 될것이다.
- UIElement를 상속받지 않은 일반 객체들은 Rendering시에 객체의 ToStirng()을 Rendering 하게 된다.
- 이것은 우리가 원하는 UI 결과가 아닐 수 있다.
- 그래서 DataTemplate를 통해서 Content 에 원하는 Object를 Binding 할 수 있다.
위의 개념은 리스트 계열을 랜더링하는 ItemsControl도 동일한 개념으로 동작한다.
[Simple Example] DataTemplate
//People ViewModel
public class PeopleViewModel : ViewModelBase
{
    public ObservableCollection<PersonViewModel> Customers { get;}
    public PeopleViewModel()
    {
        Customers = new ObservableCollection<PersonViewModel>()
        {
            new PersonViewModel() { Name = "Kim", Age = 10 },
            new PersonViewModel() { Name = "Kim2", Age = 11 },
            new PersonViewModel() { Name = "Kim3", Age = 12 },
        };
    }
}

//Person ViewModel
public class PersonViewModel : ViewModelBase
{
    private string _name;
    private int _age;
    public string Name
    {
        get => _name;
        set
        {
            _name = value;
            RaisePropertyChanged();
        }
    }
    public int Age
    {
        get => _age;
        set
        {
            _age = value;
            RaisePropertyChanged();
        }
    }
}

//ViewModel Base
public class ViewModelBase : INotifyPropertyChanged
{
    public event PropertyChangedEventHandler PropertyChanged;
    protected virtual void RaisePropertyChanged([CallerMemberName] string propertyName = null)
    {
        PropertyChanged?.Invoke(this, new PropertyChangedEventArgs(propertyName));
    }
}
<Window x:Class="WpfDataTemplate2.MainWindow"
        xmlns="http://schemas.microsoft.com/winfx/2006/xaml/presentation"
        xmlns:x="http://schemas.microsoft.com/winfx/2006/xaml"
        xmlns:d="http://schemas.microsoft.com/expression/blend/2008"
        xmlns:mc="http://schemas.openxmlformats.org/markup-compatibility/2006"
        xmlns:local="clr-namespace:WpfDataTemplate2"
        mc:Ignorable="d"
        Title="MainWindow" Height="350" Width="525">
    <Grid>
        <Grid.Resources>
            <DataTemplate x:Key="PersonTemplate">
                <StackPanel Orientation="Horizontal">
                    <TextBlock Text="{Binding Name}" FontWeight="Bold" />
                    <Button Content="{Binding Age}" Width="100"  Margin="10 0" />
                </StackPanel>
            </DataTemplate>
        </Grid.Resources>
        <ListView ItemsSource="{Binding Customers}"
                  ItemTemplate="{StaticResource PersonTemplate}"/>
    </Grid>
</Window>
- Grid.Resource에 DataTemplate을 정의해 놓는다.
- Binding된 Item개체는 Person이라는 것을 알 수 있습니다.
- DataTemplate Element에 TextBlock, Button을 정의 하고 Binding 합니다.
- ListView ItemTemplate에 정의된 Resource를 할당 합니다.
Resource를 사용하지 않고 ItemsControl인 ListView의 내부 속성에 직접 등록 하는 방법도 있습니다.
<Grid>
    <ListView ItemsSource="{Binding Customers}">
        <ListView.ItemTemplate>
            <DataTemplate>
                <StackPanel Orientation="Horizontal">
                    <TextBlock Text="{Binding Name}" FontWeight="Bold" />
                    <Button Content="{Binding Age}" Width="100" Margin="10 0" />
                </StackPanel>
            </DataTemplate>
        </ListView.ItemTemplate>
    </ListView>
</Grid>
Implicit DataTemplate (암시적인 DataTemplate)
- Binding된 특정 타입에 따라서 DataTemplate이 선택적으로 동작 할 수 없을까?
- DataTemplate의 DataType 속성으로 이것을 구현 할 수있다.
- 아래의 예제를 구현해 보자.
[Simple Example] Implicit DataTemplate
MainWindow.xaml
<Window x:Class="WpfDataTemplate.MainWindow"
xmlns="http://schemas.microsoft.com/winfx/2006/xaml/presentation"
xmlns:x="http://schemas.microsoft.com/winfx/2006/xaml"
xmlns:d="http://schemas.microsoft.com/expression/blend/2008"
xmlns:mc="http://schemas.openxmlformats.org/markup-compatibility/2006"
xmlns:local="clr-namespace:WpfDataTemplate"
xmlns:system="clr-namespace:System;assembly=mscorlib"
xmlns:view = "clr-namespace:WpfDataTemplate.View"
xmlns:viewModel = "clr-namespace:WpfDataTemplate.ViewModel"
mc:Ignorable="d"
Title="MainWindow" Height="350" Width="525">
<Grid>
<Grid.Resources>
<DataTemplate DataType="{x:Type viewModel:ButtonViewModel}">
<view:ButtonView />
</DataTemplate>
<DataTemplate DataType="{x:Type viewModel:TextBlockViewModel}">
<view:TextBlockView />
</DataTemplate>
</Grid.Resources>
<Grid.RowDefinitions>
<RowDefinition Height="3*" />
<RowDefinition Height="7*" />
</Grid.RowDefinitions>
<StackPanel Orientation="Horizontal" HorizontalAlignment="Center" Margin="10">
<Button Width="100" Height="50"
Margin="0 0 30 0"
Content="Button 1"
Command="{Binding ChangeViewModelCommand}">
<Button.CommandParameter>
<system:Int32>0</system:Int32>
</Button.CommandParameter>
</Button>
<Button Width="100" Height="50"
Content="Button 2"
Command="{Binding ChangeViewModelCommand}">
<Button.CommandParameter>
<system:Int32>1</system:Int32>
</Button.CommandParameter>
</Button>
</StackPanel>
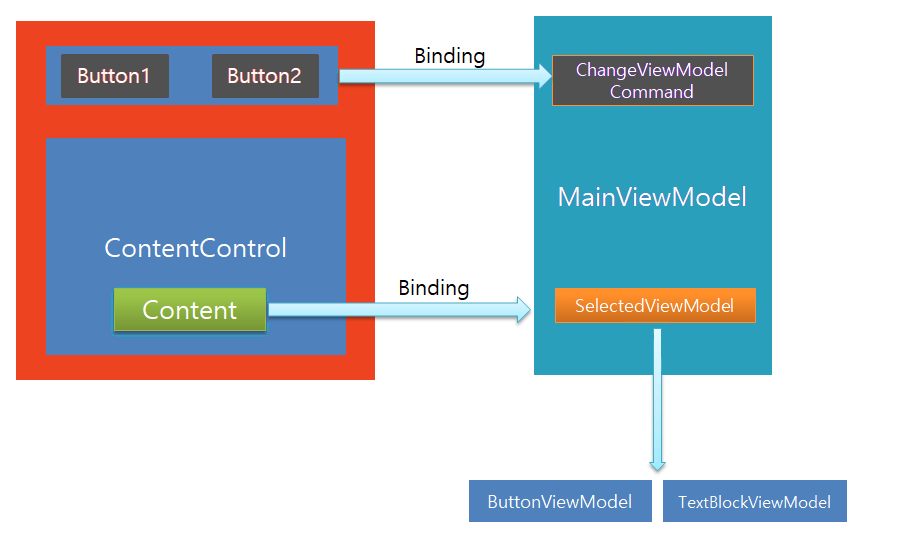
<ContentControl Content="{Binding SelectedViewModel}" Grid.Row="1"/>
</Grid>
</Window>
- ContentControl의 Content에 SelectedViewModel의 객체가 Binding 되어 있다.
- Grid.Resource에 Implict(암시적) DateTemplate 변환이 적용 되어 있다.
- ViewModel의 Type에 따라서 자동으로 해당 View로 Rendering된다.
Other Views
<!--> ButtonView.xaml <-->
<UserControl x:Class="WpfDataTemplate.View.ButtonView"
             xmlns="http://schemas.microsoft.com/winfx/2006/xaml/presentation"
             xmlns:x="http://schemas.microsoft.com/winfx/2006/xaml"
             xmlns:mc="http://schemas.openxmlformats.org/markup-compatibility/2006"
             xmlns:d="http://schemas.microsoft.com/expression/blend/2008"
             xmlns:local="clr-namespace:WpfDataTemplate.View"
             mc:Ignorable="d"
             d:DesignHeight="300" d:DesignWidth="300">
    <Grid>
        <StackPanel>
            <Button Height="70" Content="{Binding NameToButton1}" />
            <Button Height="70" Content="{Binding NameToButton2}" Margin="0 30" />
        </StackPanel>
    </Grid>
</UserControl>


<!--> TextBlockView.xaml <-->
<UserControl x:Class="WpfDataTemplate.View.TextBlockView"
             xmlns="http://schemas.microsoft.com/winfx/2006/xaml/presentation"
             xmlns:x="http://schemas.microsoft.com/winfx/2006/xaml"
             xmlns:mc="http://schemas.openxmlformats.org/markup-compatibility/2006"
             xmlns:d="http://schemas.microsoft.com/expression/blend/2008"
             xmlns:local="clr-namespace:WpfDataTemplate.View"
             mc:Ignorable="d"
             d:DesignHeight="300" d:DesignWidth="300">
    <Grid>
        <Grid>
            <StackPanel>
                <TextBlock Height="70" Text="{Binding NameToTextBlock1}" />
                <TextBlock Height="70" Text="{Binding NameToTextBlock2}" Margin="0 30" />
            </StackPanel>
        </Grid>
    </Grid>
</UserControl>
ViewModel 코드
public class ButtonViewModel : ViewModelBase
{
    private string _nameToButton1 = "Name To Button1";
    private string _nameToButton2 = "Name To Button2";

    public string NameToButton1
    {
        get => _nameToButton1;
        set
        {
            _nameToButton1 = value;
            RaisePropertyChanged();
        }
    }
    public string NameToButton2
    {
        get => _nameToButton2;
        set
        {
            _nameToButton2 = value;
            RaisePropertyChanged();
        }
    }
}

public class TextBlockViewModel : ViewModelBase
{
    private string _nameToTextBlock1 = "Name To TextBlock1";
    private string _nameToTextBlock2 = "Name To TextBlock1";

    public string NameToTextBlock1
    {
        get => _nameToTextBlock1;
        set
        {
            _nameToTextBlock1 = value;
            RaisePropertyChanged();
        }
    }
    public string NameToTextBlock2
    {
        get => _nameToTextBlock2;
        set
        {
            _nameToTextBlock2 = value;
            RaisePropertyChanged();
        }
    }
}

public class MainViewModel : ViewModelBase
{
    private ViewModelBase _selectedViewModel;
    private ButtonViewModel _buttonViewModel;
    private TextBlockViewModel _textBlockViewModel;

    //Properties
    public DelegateCommand ChangeViewModelCommand { get; }
    public ViewModelBase SelectedViewModel
    {
        get => _selectedViewModel;
        set

        {
            _selectedViewModel = value;
            RaisePropertyChanged();
        }
    }
    //Constructor
    public MainViewModel()
    {
        ChangeViewModelCommand = new DelegateCommand(ChangeViewModel);
        _buttonViewModel = new ButtonViewModel();
        _textBlockViewModel = new TextBlockViewModel();
        SelectedViewModel = _textBlockViewModel;
    }

    //Method
    private void ChangeViewModel(object obj)
    {
        var number = obj is int ? (int)obj : 0;
        SelectedViewModel = number == 0 ? (ViewModelBase)_buttonViewModel :_textBlockViewModel;
    }
}
Dependency Injection
Microsoft.Extensions.DependencyInjection
- Microsoft.Extensions.DependencyInjection Nuget Package 설치
- App.Xaml StartupUri 속성 제거
- Class 내부 생성 로직을 모두 Parameter로 입력 받도록 수정.
- App.Xaml.cs 에서 Dependency Injection 서비스 등록 및 실행
[Simple Example] Dependency Injection
<!--> StartupUri="MainWindow.xaml" 속성 삭제<-->

<!--> App.xaml <-->
<Application x:Class="WpfDataTemplate.App"
             xmlns="http://schemas.microsoft.com/winfx/2006/xaml/presentation"
             xmlns:x="http://schemas.microsoft.com/winfx/2006/xaml"
             xmlns:local="clr-namespace:WpfDataTemplate">
</Application>
//App.xaml.cs
using System;
using System.Windows;
using Microsoft.Extensions.DependencyInjection;
using WpfDataTemplate.ViewModel;

namespace WpfDataTemplate
{
    /// <summary>
    /// Interaction logic for App.xaml
    /// </summary>
    public partial class App
    {
        private readonly IServiceProvider _serviceProvider;

        public App()
        {
            ServiceCollection services = new ServiceCollection();
            ConfigureServices(services);
            _serviceProvider = services.BuildServiceProvider();
        }
        private void ConfigureServices(ServiceCollection services)
        {
            services.AddTransient<MainWindow>();
            services.AddTransient<ButtonViewModel>();
            services.AddTransient<TextBlockViewModel>();
            services.AddTransient<MainViewModel>();

        }
        protected override void OnStartup(StartupEventArgs e)
        {
            base.OnStartup(e);
            var mainWindow = _serviceProvider.GetService<MainWindow>();
            mainWindow?.Show();
        }
    }
}

//내부 생성 로직을 생성자 파라미터로 받도록 함.
//MainWindow.xaml.cs
public partial class MainWindow
{
    private MainViewModel _mainViewModel;
    public MainWindow(MainViewModel mainViewModel)
    {
        InitializeComponent();
        _mainViewModel = mainViewModel;
        DataContext = _mainViewModel;
    }
}


//내부에서 생성하던 ViewModel들을 생성자 파라미터로 받도록 정의
//MainViewModel.cs
public MainViewModel(ButtonViewModel buttonViewModel, TextBlockViewModel textBlockViewModel)
{
    ChangeViewModelCommand = new DelegateCommand(ChangeViewModel);
    _buttonViewModel = buttonViewModel;
    _textBlockViewModel = textBlockViewModel;
    SelectedViewModel = _textBlockViewModel;
}
...
Styling Application
기본 CheckBox ControlTemplate 예제
[Simple Example] CheckBox Style Property
<Grid>
    <Grid.Resources>
        <Style TargetType="Button" x:Key="buttonStyle">
            <Setter Property="Background" Value="Brown"></Setter>
            <Setter Property="Foreground" Value="Chartreuse"></Setter>
        </Style>
    </Grid.Resources>
    <StackPanel>
        <Button Height="70" Content="{Binding NameToButton1}"
                Style="{StaticResource buttonStyle}"/>
        <Button Height="70" Content="{Binding NameToButton2}" Margin="0 30"
                Style="{StaticResource buttonStyle}"/>
    </StackPanel>
</Grid>
- Resource에서 Style Property를 정의 하지 않는다면 어떻게 될까?
- Button 마다 Background/Foreground Property Element를 정의 해 줘야 한다.
- 만약 Button 개수가 더 많이 늘어 난다면, 추가해야 하는 코드는 더 늘어 날 것이다.
- 하지만 위 코드 예제를 활용하면 간단하게 모든 Button에 Style을 적용 할 수 있다.
Inherit Style (스타일 상속)
<Grid.Resources>
    <Style TargetType="Button" x:Key="buttonStyleBase">
        <Setter Property="Background" Value="Brown"></Setter>
        <Setter Property="Foreground" Value="Chartreuse"></Setter>
    </Style>
    <Style TargetType="Button" x:Key="buttonStyle"
            BasedOn="{StaticResource buttonStyleBase}">
        <Setter Property="FontWeight" Value="Bold"></Setter>
    </Style>
</Grid.Resources>
<StackPanel>
    <Button Height="70" Content="{Binding NameToButton1}"
            Style="{StaticResource buttonStyle}"/>
    <Button Height="70" Content="{Binding NameToButton2}" Margin="0 30"
            Style="{StaticResource buttonStyle}"/>
</StackPanel>
</Grid>
- buttonStyleBase 에서 Background/Foreground를 정의 한다.
- buttonStyle 에서 buttonStyleBase 를 BaseOn 속성에서 정의 하여 상속 받는다.
- buttonStyle 에서 추가적인 속성인 Font 속성을 정의 한다.
- 우리가 Class 에서 상속받는 개념과 동일한 개념이다.
Control Template 익히기
Button Control Template
[Simple Example] Button ControlTemplate
<Button Width="50" Height="50">
      <Button.Template>
        <ControlTemplate TargetType="Button">
          <Ellipse Fill="Orange" x:Name="ellipse"/>
          <ControlTemplate.Triggers>
            <Trigger Property="IsMouseOver" Value="True">
              <Setter Property="Fill" Value="Green"
                      TargetName="ellipse"/>
            </Trigger>
          </ControlTemplate.Triggers>
        </ControlTemplate>
      </Button.Template>
</Button>
Style - ControlTemplate 셋팅하기
[Simple Example] Style - ControlTemplate
<Style TargetType="Button">
    <Setter Property="Template">
        <Setter.Value>
            <ControlTemplate TargetType="Button">
            <Ellipse Fill="Orange" x:Name="ellipse"/>
            <ControlTemplate.Triggers>
                <Trigger Property="IsMouseOver" Value="True">
                <Setter Property="Fill" Value="Green"
                        TargetName="ellipse"/>
                </Trigger>
            </ControlTemplate.Triggers>
            </ControlTemplate>
        </Setter.Value>
    </Setter>
</Style>
기존 CheckBox의 ControlTemplate
[Simple Example] .net Checkbox ControlTemplate
<UserControl.Resources>
        <Style x:Key="FocusVisual">
            <Setter Property="Control.Template">
                <Setter.Value>
                    <ControlTemplate>
                        <Rectangle Margin="2" SnapsToDevicePixels="true" Stroke="{DynamicResource {x:Static SystemColors.ControlTextBrushKey}}" StrokeThickness="1" StrokeDashArray="1 2"/>
                    </ControlTemplate>
                </Setter.Value>
            </Setter>
        </Style>
        <SolidColorBrush x:Key="OptionMark.Static.Background" Color="#FFFFFFFF"/>
        <SolidColorBrush x:Key="OptionMark.Static.Border" Color="#FF707070"/>
        <Style x:Key="OptionMarkFocusVisual">
            <Setter Property="Control.Template">
                <Setter.Value>
                    <ControlTemplate>
                        <Rectangle Margin="14,0,0,0" SnapsToDevicePixels="true" Stroke="{DynamicResource {x:Static SystemColors.ControlTextBrushKey}}" StrokeThickness="1" StrokeDashArray="1 2"/>
                    </ControlTemplate>
                </Setter.Value>
            </Setter>
        </Style>
        <SolidColorBrush x:Key="OptionMark.MouseOver.Background" Color="#FFF3F9FF"/>
        <SolidColorBrush x:Key="OptionMark.MouseOver.Border" Color="#FF5593FF"/>
        <SolidColorBrush x:Key="OptionMark.MouseOver.Glyph" Color="#FF212121"/>
        <SolidColorBrush x:Key="OptionMark.Disabled.Background" Color="#FFE6E6E6"/>
        <SolidColorBrush x:Key="OptionMark.Disabled.Border" Color="#FFBCBCBC"/>
        <SolidColorBrush x:Key="OptionMark.Disabled.Glyph" Color="#FF707070"/>
        <SolidColorBrush x:Key="OptionMark.Pressed.Background" Color="#FFD9ECFF"/>
        <SolidColorBrush x:Key="OptionMark.Pressed.Border" Color="#FF3C77DD"/>
        <SolidColorBrush x:Key="OptionMark.Pressed.Glyph" Color="#FF212121"/>
        <SolidColorBrush x:Key="OptionMark.Static.Glyph" Color="#FF212121"/>
        <Style TargetType="{x:Type CheckBox}">
            <Setter Property="FocusVisualStyle" Value="{StaticResource FocusVisual}"/>
            <Setter Property="Background" Value="{StaticResource OptionMark.Static.Background}"/>
            <Setter Property="BorderBrush" Value="{StaticResource OptionMark.Static.Border}"/>
            <Setter Property="Foreground" Value="{DynamicResource {x:Static SystemColors.ControlTextBrushKey}}"/>
            <Setter Property="BorderThickness" Value="1"/>
            <Setter Property="Template">
                <Setter.Value>
                    <ControlTemplate TargetType="{x:Type CheckBox}">
                        <Grid x:Name="templateRoot" Background="Transparent" SnapsToDevicePixels="True">
                            <Grid.ColumnDefinitions>
                                <ColumnDefinition Width="Auto"/>
                                <ColumnDefinition Width="*"/>
                            </Grid.ColumnDefinitions>
                            <Border x:Name="checkBoxBorder" BorderBrush="{TemplateBinding BorderBrush}" BorderThickness="{TemplateBinding BorderThickness}" Background="{TemplateBinding Background}" HorizontalAlignment="{TemplateBinding HorizontalContentAlignment}" Margin="1" VerticalAlignment="{TemplateBinding VerticalContentAlignment}">
                                <Grid x:Name="markGrid">
                                    <Path x:Name="optionMark" Data="F1 M 9.97498,1.22334L 4.6983,9.09834L 4.52164,9.09834L 0,5.19331L 1.27664,3.52165L 4.255,6.08833L 8.33331,1.52588e-005L 9.97498,1.22334 Z " Fill="{StaticResource OptionMark.Static.Glyph}" Margin="1" Opacity="0" Stretch="None"/>
                                    <Rectangle x:Name="indeterminateMark" Fill="{StaticResource OptionMark.Static.Glyph}" Margin="2" Opacity="0"/>
                                </Grid>
                            </Border>
                            <ContentPresenter x:Name="contentPresenter" Grid.Column="1" Focusable="False" HorizontalAlignment="{TemplateBinding HorizontalContentAlignment}" Margin="{TemplateBinding Padding}" RecognizesAccessKey="True" SnapsToDevicePixels="{TemplateBinding SnapsToDevicePixels}" VerticalAlignment="{TemplateBinding VerticalContentAlignment}"/>
                        </Grid>
                        <ControlTemplate.Triggers>
                            <Trigger Property="HasContent" Value="true">
                                <Setter Property="FocusVisualStyle" Value="{StaticResource OptionMarkFocusVisual}"/>
                                <Setter Property="Padding" Value="4,-1,0,0"/>
                            </Trigger>
                            <Trigger Property="IsMouseOver" Value="true">
                                <Setter Property="Background" TargetName="checkBoxBorder" Value="{StaticResource OptionMark.MouseOver.Background}"/>
                                <Setter Property="BorderBrush" TargetName="checkBoxBorder" Value="{StaticResource OptionMark.MouseOver.Border}"/>
                                <Setter Property="Fill" TargetName="optionMark" Value="{StaticResource OptionMark.MouseOver.Glyph}"/>
                                <Setter Property="Fill" TargetName="indeterminateMark" Value="{StaticResource OptionMark.MouseOver.Glyph}"/>
                            </Trigger>
                            <Trigger Property="IsEnabled" Value="false">
                                <Setter Property="Background" TargetName="checkBoxBorder" Value="{StaticResource OptionMark.Disabled.Background}"/>
                                <Setter Property="BorderBrush" TargetName="checkBoxBorder" Value="{StaticResource OptionMark.Disabled.Border}"/>
                                <Setter Property="Fill" TargetName="optionMark" Value="{StaticResource OptionMark.Disabled.Glyph}"/>
                                <Setter Property="Fill" TargetName="indeterminateMark" Value="{StaticResource OptionMark.Disabled.Glyph}"/>
                            </Trigger>
                            <Trigger Property="IsPressed" Value="true">
                                <Setter Property="Background" TargetName="checkBoxBorder" Value="{StaticResource OptionMark.Pressed.Background}"/>
                                <Setter Property="BorderBrush" TargetName="checkBoxBorder" Value="{StaticResource OptionMark.Pressed.Border}"/>
                                <Setter Property="Fill" TargetName="optionMark" Value="{StaticResource OptionMark.Pressed.Glyph}"/>
                                <Setter Property="Fill" TargetName="indeterminateMark" Value="{StaticResource OptionMark.Pressed.Glyph}"/>
                            </Trigger>
                            <Trigger Property="IsChecked" Value="true">
                                <Setter Property="Opacity" TargetName="optionMark" Value="1"/>
                                <Setter Property="Opacity" TargetName="indeterminateMark" Value="0"/>
                            </Trigger>
                            <Trigger Property="IsChecked" Value="{x:Null}">
                                <Setter Property="Opacity" TargetName="optionMark" Value="0"/>
                                <Setter Property="Opacity" TargetName="indeterminateMark" Value="1"/>
                            </Trigger>
                        </ControlTemplate.Triggers>
                    </ControlTemplate>
                </Setter.Value>
            </Setter>
        </Style>
    </UserControl.Resources>
- 설명하기 귀찮아서 기본 CheckBox의 ControlTemplate을 가져왔다.
Validate 사용자 입력
INotifyDataErrorInfo 을 활용한 Validate 기능
INotifyDataErrorInfo 의 정의를 보자
// Licensed to the .NET Foundation under one or more agreements.
// The .NET Foundation licenses this file to you under the MIT license.

using System.Collections;

namespace System.ComponentModel
{
    public interface INotifyDataErrorInfo
    {
        bool HasErrors { get; }
        IEnumerable GetErrors(string? propertyName);
        event EventHandler<DataErrorsChangedEventArgs>? ErrorsChanged;
    }
}
- HasErrors : 엔터티에 유효성 검사 오류가 있는지 여부를 나타내는 값을 가져옵니다.
- GetErrors : 지정된 속성이나 전체 엔터티에 대한 유효성 검사 오류를 가져옵니다.
- ErrorsChanged : 속성이나 전체 엔터티에 대해 유효성 검사 오류가 변경된 경우 발생합니다.
[Simple Example] INotifyDataErrorInfo를 활용한 Validation 체크 예제
// ViewModelBase.cs
public class ViewModelBase : INotifyPropertyChanged
{
    public event PropertyChangedEventHandler PropertyChanged;

    protected virtual void RaisePropertyChanged([CallerMemberName] string propertyName = null)
    {
        PropertyChanged?.Invoke(this, new PropertyChangedEventArgs(propertyName));
    }
}

//ValidationViewModelBase.cs
public class ValidationViewModelBase : ViewModelBase, INotifyDataErrorInfo
{
    private readonly Dictionary<string, List<string>> _errorsByPropertyName = new Dictionary<string, List<string>>();

    public event EventHandler<DataErrorsChangedEventArgs> ErrorsChanged;

    public bool HasErrors => _errorsByPropertyName?.Any() ?? false;

    public IEnumerable GetErrors(string propertyName)
    {
        return propertyName !=null && _errorsByPropertyName.ContainsKey(propertyName)
            ? _errorsByPropertyName[propertyName]
            : Enumerable.Empty<string>();
    }

    protected virtual void OnErrorsChanged(DataErrorsChangedEventArgs e)
    {
        ErrorsChanged?.Invoke(this, e);
    }

    protected void AddError(string error, [CallerMemberName] string propertyName = null)
    {
        if (propertyName is null) return;

        if (!_errorsByPropertyName.ContainsKey(propertyName))
        {
            _errorsByPropertyName[propertyName] = new List<string>();
        }
        if (!_errorsByPropertyName[propertyName].Contains(error))
        {
            _errorsByPropertyName[propertyName].Add(error);
            OnErrorsChanged(new DataErrorsChangedEventArgs(propertyName));
            RaisePropertyChanged(nameof(HasErrors));
        }
    }

    protected void ClearErrors([CallerMemberName] string propertyName = null)
    {
        if (propertyName is null) return;

        if (_errorsByPropertyName.ContainsKey(propertyName))
        {
            _errorsByPropertyName.Remove(propertyName);
            OnErrorsChanged(new DataErrorsChangedEventArgs(propertyName));
            RaisePropertyChanged(nameof(HasErrors));
        }
    }
}


//MainViewModel.cs
public class MainViewModel : ValidationViewModelBase
{
    private string _firstName;
    private string _lastName;

    public MainViewModel()
    {
        _firstName = "Gil Dong";
        _lastName = "Hong";
    }

    public string FirstName
    {
        get => _firstName;
        set
        {
            if (value == _firstName) return;
            _firstName = value;
            RaisePropertyChanged();

            if (string.IsNullOrEmpty(_firstName))
            {
                AddError("FirstName is Required");
            }
            else
            {
                ClearErrors();
            }
        }
    }

    public string LastName
    {
        get => _lastName;
        set
        {
            if (value == _lastName) return;
            _lastName = value;
            RaisePropertyChanged();

            if (string.IsNullOrEmpty(_lastName))
            {
                AddError("FirstName is Required");
            }
            else
            {
                ClearErrors();
            }
        }
    }
}
MainViewModel을 제외한 ViewModel들은 상속받아야 하는 BaseViewMode들이다.
<Window x:Class="WPF_Validate_Ex.MainWindow"
        xmlns="http://schemas.microsoft.com/winfx/2006/xaml/presentation"
        xmlns:x="http://schemas.microsoft.com/winfx/2006/xaml"
        xmlns:d="http://schemas.microsoft.com/expression/blend/2008"
        xmlns:mc="http://schemas.openxmlformats.org/markup-compatibility/2006"
        xmlns:local="clr-namespace:WPF_Validate_Ex"
        mc:Ignorable="d"
        Title="MainWindow" Height="350" Width="525">
    <Grid>
        <Grid.RowDefinitions>
            <RowDefinition Height="auto"></RowDefinition>
            <RowDefinition Height="auto "></RowDefinition>
        </Grid.RowDefinitions>

        <StackPanel Grid.Row="0" Orientation="Horizontal">
            <TextBlock Margin="0 0 10 0">First Name : </TextBlock>
            <TextBox Width="200" Text="{Binding FirstName}"></TextBox>
        </StackPanel>
        <StackPanel Margin="0 5 0 0" Grid.Row="1" Orientation="Horizontal">
            <TextBlock Margin="0 0 10 0">Last Name : </TextBlock>
            <TextBox  Width="200"  Text="{Binding LastName}"></TextBox>
        </StackPanel>
    </Grid>
</Window>


<!--> App.Xaml <-->
<!--> Error Template 및 Trigger <-->
<Application x:Class="WPF_Validate_Ex.App"
             xmlns="http://schemas.microsoft.com/winfx/2006/xaml/presentation"
             xmlns:x="http://schemas.microsoft.com/winfx/2006/xaml"
             xmlns:local="clr-namespace:WPF_Validate_Ex"
             StartupUri="MainWindow.xaml">
    <Application.Resources>
        <Style TargetType="TextBox">
            <Setter Property="Validation.ErrorTemplate">
                <Setter.Value>
                    <ControlTemplate>
                        <StackPanel>
                            <AdornedElementPlaceholder x:Name="placeholder" />
                            <TextBlock Foreground="Red"
                                       Text="{Binding ElementName=placeholder,
                              Path=AdornedElement.(Validation.Errors)[0].ErrorContent}"
                                       Margin="3 0 0 0" />
                        </StackPanel>
                    </ControlTemplate>
                </Setter.Value>
            </Setter>
            <Style.Triggers>
                <Trigger Property="Validation.HasError" Value="True">
                    <Setter Property="Background" Value="Red" />
                    <Setter Property="Margin" Value="0 0 0 20" />
                    <Setter Property="ToolTip"
                            Value="{Binding RelativeSource={RelativeSource Self},
                        Path=(Validation.Errors)[0].ErrorContent}" />
                </Trigger>
            </Style.Triggers>
        </Style>
    </Application.Resources>
</Application>
Style 리소스를 App.Xaml에 등록 했지만 , Resource 활용 방식은 여러가지가 있으니
원하는 방식으로 등록해서 사용하면 된다.
[Simple Exampel] ToolTip Style을 지정해서 적용하는 방법
<Style TargetType="ToolTip" x:Key="CustomToolTipStyle">
    <Setter Property="Background" Value="Chartreuse"></Setter>
</Style>
<ToolTip x:Key="CustomErrorToolTip"  DataContext="{Binding Path=PlacementTarget, RelativeSource={RelativeSource Self}}">
    <ToolTip.Content>
        <Binding Path="(Validation.Errors)[0].ErrorContent"/>
    </ToolTip.Content>
    <ToolTip.Style>
        <Binding Source="{StaticResource CustomToolTipStyle}"></Binding>
    </ToolTip.Style>
</ToolTip>
<Style TargetType="TextBox">
    <Setter Property="Validation.ErrorTemplate">
        <Setter.Value>
            <ControlTemplate>
                <StackPanel>
                    <AdornedElementPlaceholder x:Name="placeholder" />
                    <TextBlock Foreground="Red"
                                Text="{Binding ElementName=placeholder,
                        Path=AdornedElement.(Validation.Errors)[0].ErrorContent}"
                                Margin="3 0 0 0" />
                </StackPanel>
            </ControlTemplate>
        </Setter.Value>
    </Setter>
    <Style.Triggers>
        <Trigger Property="Validation.HasError" Value="True">
            <Setter Property="Background" Value="Red"/>
            <Setter Property="Margin" Value="0 0 0 20" />
            <Setter Property="Margin" Value="0 0 0 20"/>
            <Setter Property="ToolTip"
                    Value="{StaticResource CustomErrorToolTip}">
            </Setter>
        </Trigger>
    </Style.Triggers>
</Style>
기타 유용한 Example
Generic DelegateCommad 구현
using System;
using System.Globalization;
using System.Windows.Input;

internal interface ICommand<T> : ICommand
{
    bool CanExecute(T param);
    void Execute(T param);
}


public class DelegateCommandC<T> : ICommand<T>
{
    private readonly Func<T, bool> _canExecute;
    private readonly Action<T> _execute;

    public DelegateCommandC(Action<T> execute, Func<T, bool> canExecute = null)
    {
        if (execute == null)
            throw new ArgumentException();

        _execute = execute;
        _canExecute = canExecute;
    }

    bool ICommand.CanExecute(object parameter)
    {
        return this.CanExecute(DelegateCommandC<T>.GetGenericParameter(parameter, true));
    }

    void ICommand.Execute(object parameter)
    {
        this.Execute(DelegateCommandC<T>.GetGenericParameter(parameter));
    }

    public event EventHandler CanExecuteChanged;

    public void Execute(T parameter)
    {
        _execute(parameter);
    }

    public bool CanExecute(T parameter)
    {
        return _canExecute is null || _canExecute(parameter);
    }

    public void RaiseCanExecuteChanged()
    {
        CanExecuteChanged?.Invoke(this, EventArgs.Empty);
    }

    private static T GetGenericParameter(object parameter, bool suppressCastException = false)
    {
        parameter = TypeCastHelper.TryCast(parameter, typeof(T));
        if (parameter == null || parameter is T)
            return (T)parameter;
        if (suppressCastException)
            return default(T);
        throw new InvalidCastException(string.Format(
            "CommandParameter: Unable to cast object of type '{0}' to type '{1}'",
            (object)parameter.GetType().FullName, (object)typeof(T).FullName));
    }

    public static class TypeCastHelper
    {
        public static object TryCast(object value, Type targetType)
        {
            Type type1 = Nullable.GetUnderlyingType(targetType);
            if ((object)type1 == null)
                type1 = targetType;
            Type type2 = type1;
            if (type2.IsEnum && value is string)
                value = Enum.Parse(type2, (string)value, false);
            else if (value is IConvertible && !targetType.IsAssignableFrom(value.GetType()))
                value = Convert.ChangeType(value, type2, (IFormatProvider)CultureInfo.InvariantCulture);
            if (value == null && targetType.IsValueType)
                value = Activator.CreateInstance(targetType);
            return value;
        }
    }
}
댓글남기기